目录
第一部分 概述
OpenLDAP客户端和服务器能够使用传输层安全(TLS)框架来提供完整性和机密性保护,并使用SASL外部机制支持LDAP身份验证。本文介绍如何启用LDAP的安全连接,访问LDAP官方文档查看完整配置。
LDAP的安全连接有两种方式:
-
启用标准
ldap:///连接,即监听所有网络接口上的LDAP标准端口389,通过StartTLS对通信内容进行加密处理,避免明文传输。 -
启用
ldaps:///连接,在TLS中传输LDAP协议,默认端口为636。
1.1 传输层安全协议
TLS是传输层安全协议(Transport Layer Security),也经常与其前身安全套接层(SSL,Secure Sockets Layer)的并列,写作TLS/SSL。有时也直接以SSL代之。该协议广泛应用于电子邮件、即时通信等应用中,最常见的场景就是HTTPS。SSL系列协议由于年代久远且屡屡爆出安全隐患问题,自2015年后已被全面弃用。
TLS协议旨在运用证书来提供加密,保护端对端的通信秘密、完整和认证功能,免受第三方的窥探和篡改。TLS在 1999 年被互联网工程任务组(IETF,Internet Engineering Task Force)确立为标准之一。目前最新的TLS版本为1.3,为同时兼顾安全性和兼容性,本文遵循 Mozilla SSL 配置生成器,采用同时启用TLS 1.2和TLS 1.3的中间(Intermediate)配置。
第二部分 配置安全连接
2.1 签发证书(自签名证书,如已有证书,则忽略此步骤)
自己签发的证书,是不受其他服务器信任的,生产环境不建议采用自签名证书。此步骤仅供参考,需要根据实际情况进行调整
在LDAP编译时已启用TLS,并采用OpenSSL(--with-tls=openssl),所以此处以OpenSSL命令行工具为例,签发根证书和服务器证书。首先为根证书编写OpenSSL配置文件。
toml[ req ]
distinguished_name  = req_distinguished_name
string_mask         = utf8only
x509_extensions     = v3_ca
prompt              = no

[ req_distinguished_name ]
countryName                     = CN
stateOrProvinceName             = Nanjing
localityName                    = Nanjing
organizationName                = Jianggujin
organizationalUnitName          = Jianggujin
commonName                      = Jianggujin Certificate Authority
emailAddress                    = ldap@jianggujin.com

[ v3_ca ]
subjectKeyIdentifier = hash
authorityKeyIdentifier = keyid:always,issuer
basicConstraints = critical, CA:true
keyUsage = critical, digitalSignature, keyCertSign
将上述内容保存为 ca.conf 文件,然后执行如下命令,生成根证书的4096位RSA私钥,并签发根证书。
sh$ openssl genrsa -out ca.key 4096
$ openssl req -x509 -new -sha512 -nodes -key ca.key -days 7307 -out ca.crt -config ca.conf
接下来给服务器证书编写OpenSSL配置。此处要注意 commonName 和 sans 部分应与服务器的主机名一致。
toml[ req ]
prompt              = no
days                = 365
default_md          = sha256
distinguished_name  = req_distinguished_name
x509_extensions      = v3_server

[ req_distinguished_name ]
countryName                     = CN
stateOrProvinceName             = Nanjing
localityName                    = Nanjing
organizationName                = Jianggujin
organizationalUnitName          = Jianggujin
commonName                      = ldap.jianggujin.com
emailAddress                    = ldap@jianggujin.com

[ v3_server ]
basicConstraints = CA:false
subjectKeyIdentifier = hash
authorityKeyIdentifier = keyid:always,issuer:always
keyUsage = critical, digitalSignature, keyEncipherment
extendedKeyUsage = serverAuth, clientAuth
subjectAltName = @sans

[ sans ]
DNS.0 = ldap.jianggujin.com
将上述内容保存为 server.conf 文件后,然后执行如下命令,先签发服务器证书请求,再用根证书签发服务器证书。
shell$ openssl genrsa -out server.key 2048
$ openssl req -config server.conf -key server.key -new -out server.csr
$ openssl x509 -req -in server.csr -CA ca.crt -CAkey ca.key -out server.crt -extfile server.conf -extensions v3_server -CAcreateserial
最后使用根证书验证服务器证书是否有效。
shell$ openssl verify -CAfile ca.crt server.crt
server.crt: OK
如此,根证书和服务器证书就都签发成功了。
2.2 配置TLS
编写如下LDIF文件,分别添加 olcTLSCACertificateFile、olcTLSCertificateFile 和 olcTLSCertificateKeyFile 属性,对应 CA 证书文件、服务器证书文件、服务器私钥文件。
dn: cn=config
changetype: modify
add: olcTLSCACertificateFile
olcTLSCACertificateFile: /opt/openLDAP/cert/ca.crt # 修改为实际路径
-
add: olcTLSCertificateFile
olcTLSCertificateFile: /opt/openLDAP/cert/server.crt # 修改为实际路径
-
add: olcTLSCertificateKeyFile
olcTLSCertificateKeyFile: /opt/openLDAP/cert/server.key # 修改为实际路径
-
add: olcTLSCipherSuite
olcTLSCipherSuite: ECDHE-ECDSA-AES128-GCM-SHA256:ECDHE-RSA-AES128-GCM-SHA256:ECDHE-ECDSA-AES256-GCM-SHA384:ECDHE-RSA-AES256-GCM-SHA384:ECDHE-ECDSA-CHACHA20-POLY1305:ECDHE-RSA-CHACHA20-POLY1305:DHE-RSA-AES128-GCM-SHA256:DHE-RSA-AES256-GCM-SHA384
-
add: olcTLSDHParamFile
olcTLSDHParamFile: /opt/openLDAP/cert/ffdhe2048.txt # 该文件参见下文获取方式
将上述内容保存为 tls.ldif 文件后,然后执行如下命令,修改LDAP已有配置。
shell$ /opt/openLDAP/sbin/slapmodify -n 0 -l tls.ldif
在上述配置中,除了添加证书配置外,用olcTLSCipherSuite指定密码套件。此处填写的密码套件是OpenSSL格式的。这些密码套件中都使用了瞬现迪菲-赫尔曼密钥交换(DHE,Ephemeral Diffie-Hellman)和瞬现椭圆曲线迪菲-赫尔曼密钥交换(ECDHE,Elliptic Curve Ephemeral Diffie-Hellman),能提供完全向前保密(PFS,Perfect Forward Secrecy),即便私钥暴露,攻击者也不能解密暴露之前的会话内容。
为此,需要用olcTLSDHParamFile指定DH参数。因为服务器私钥为2048位,也要选择相同位数的DH参数。可以从 Mozilla 下载这个参数。
2.3 配置安全高强度系数
OpenLDAP中的安全强度系数(SSF,Security Strength Factor)用于控制特定操作的密钥强度下限。在olcSecurity中可以配置一组系数,控制不同的操作。
下面列出了几种常见的安全强度系数。
- ssf:全局安全强度系数。
- tls:
TLS安全强度系数。 - update_ssf:更改内容所需的安全强度系数。
- simple_bind:简单认证(即用户名/密码认证)所需的安全强度系数。
简单起见,本文直接配置与密码套件对应的全局安全强度系数,全局禁用了明文操作
0 (zero) implies no protection, 1 implies integrity protection only, 56 DES or other weak ciphers, 112 triple DES and similar ciphers, 128 RC4, Blowfish and other similar ciphers, 256 modern ciphers
dn: cn=config
changetype: modify
add: olcSecurity
olcSecurity: ssf=128
将上述内容保存为 ssf.ldif 文件后,然后执行如下命令,修改LDAP已有配置。
shell$ /opt/openLDAP/sbin/slapmodify -n 0 -l ssf.ldif
2.4 测试TLS 配置
启动LDAP服务,启动命令中增加-h参数,同时启用ldap:///和ldaps:///
shell$ cd /opt/openLDAP/libexec && ./slapd -h "ldap:/// ldaps:///"
当不指定
-h参数运行slapd时,默认端点为ldap:///,即监听所有网络接口上的LDAP标准端口389,并支持StartTLS。使用上述方式可同时启用,开放ldaps:///的端口636(注意:需要增加防火墙配置)
2.4.1 使用ldapsearch测试连接
shell$ /opt/openLDAP/bin/ldapsearch -x -H ldap://ldap.jianggujin.com -D "cn=config" -W -b "cn=schema,cn=config"
Enter LDAP Password:
ldap_bind: Confidentiality required (13)
        additional info: confidentiality required
命令中的参数意义如下。
- -x:使用简单认证。
- -H:服务器地址,为空则表示本机。
- -D:要绑定的 DN。
- -W:提示输入绑定密码。
返回状态码为 13,服务器拒绝了明文连接,并要求使用加密连接则表示配置安全强度系数生效。增加 -ZZ 参数,使用TLS向服务器发起请求,并在发起TLS连接失败的情况下退出。
shell$ /opt/openLDAP/bin/ldapsearch -x -H ldap://ldap.jianggujin.com -D "cn=config" -W -b "cn=schema,cn=config" -ZZ
连接成功则配置完成,此处需要注意,如果出现证书验证失败问题,尝试将证书导入系统后重试。
shell$ cp ca.crt /etc/pki/ca-trust/source/anchors/
$ update-ca-trust extract
经过上述步骤操作后如依然出现无法连接,提示信息如下:
shell$ /opt/openLDAP/bin/ldapsearch -x -H ldap://ldap.jianggujin.com -D "cn=config" -W -b "cn=schema,cn=config" -ZZ
ldap_start_tls: Connect error (-11)
        additional info: error:1416F086:SSL routines:tls_process_server_certificate:certificate verify failed (self signed certificate in certificate chain)
该错误是因为我们的自签名证书不受信导致的,可以尝试修改LDAP客户端的配置,添加TLS_CACERT并指定CA证书,该值等价于配置TLS中的olcTLSCACertificateFile参数。
shell$ vi /opt/openLDAP/etc/openldap/ldap.conf
在其中增加一行
TLS_CACERT /opt/ca/ca.crt # 修改为实际路径
修改完成并保存后,重试命令。
除了使用-ZZ参数开启startTLS外,也可以使用下面的命令测试LDAPS连接
shell$ /opt/openLDAP/bin/ldapsearch -x -H ldaps://ldap.jianggujin.com -D "cn=config" -W -b "cn=schema,cn=config"
2.4.2 使用ApacheDirectoryStudios测试连接
连接过程如提示信任证书选择全部信任
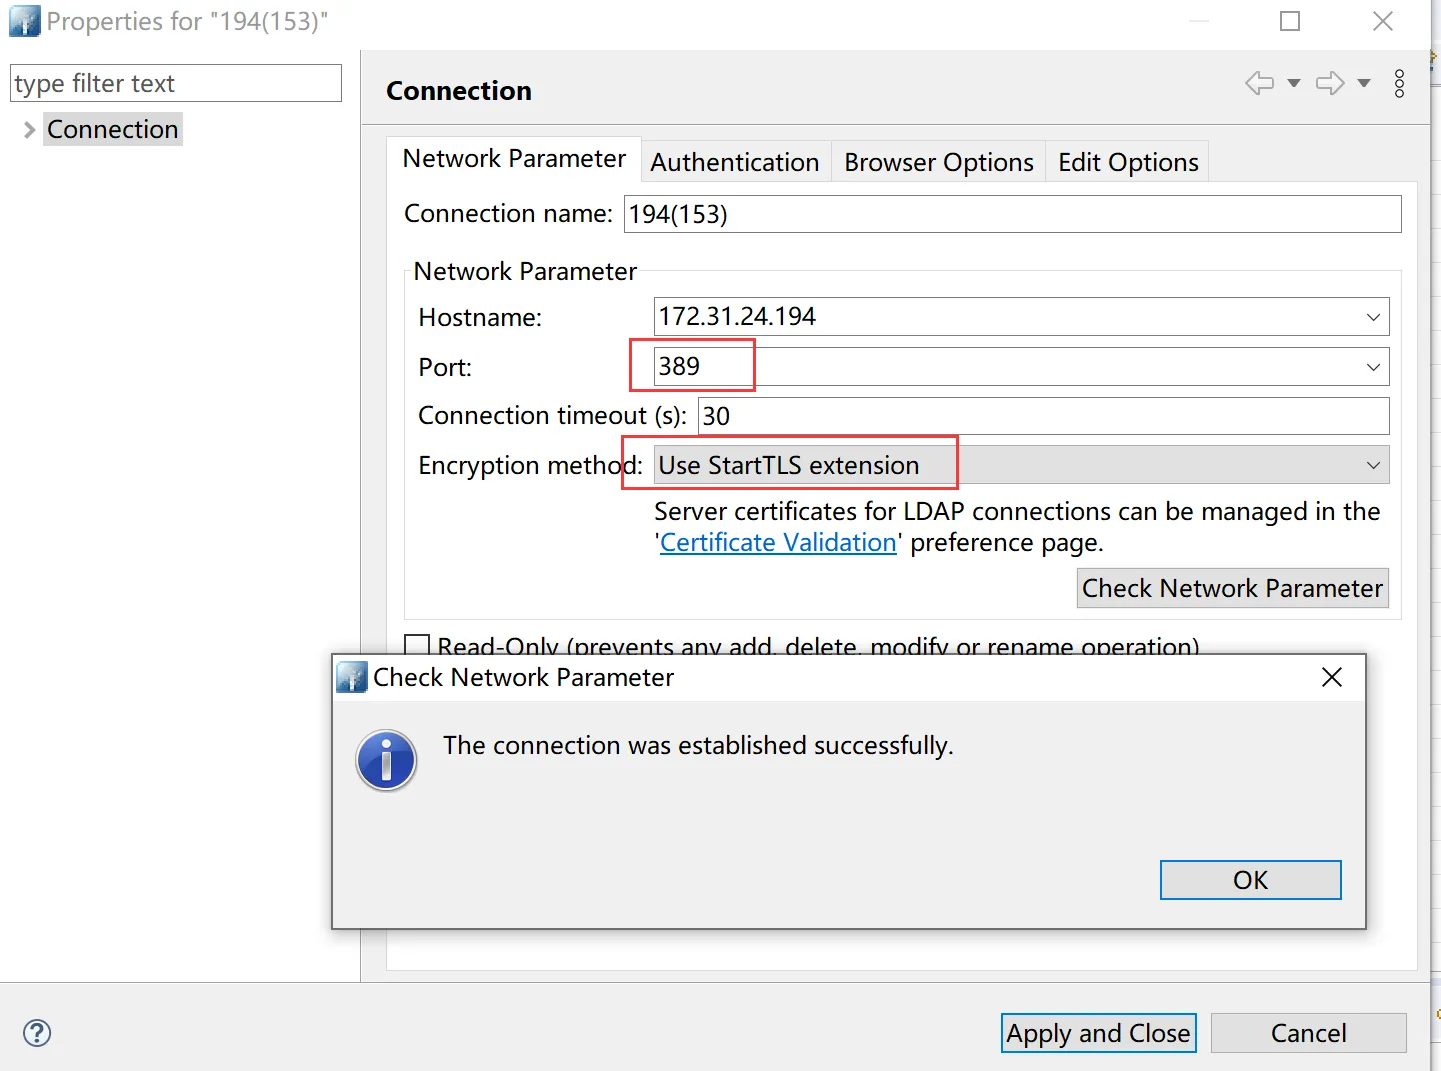
图一:ldap:///并使用StartTLS方式连接

图二:ldaps:///方式连接
2.4.3 Java代码测试连接(novell ldaps)
javaLDAPConnection conn = new LDAPConnection(new LDAPJSSESecureSocketFactory(new DefaultSSLFactory())); # cn.hutool.http.ssl.DefaultSSLFactory
conn.connect("172.31.24.194", 636);
conn.bind(LDAPConnection.LDAP_V3, "cn=config", "jianggujin".getBytes("UTF-8"));
2.4.4 Java代码测试连接(novell ldap+startTLS)
javaLDAPConnection conn = new LDAPConnection(new LDAPJSSEStartTLSFactory(new DefaultSSLFactory())); # cn.hutool.http.ssl.DefaultSSLFactory
conn.connect("172.31.24.194", 389);
conn.startTLS();
conn.bind(LDAPConnection.LDAP_V3, "cn=config", "jianggujin".getBytes("UTF-8"));
2.4.5 Java代码测试连接(原生StartTLS模式)
javaHashtable<String, String> env = new Hashtable<>();
env.put(Context.INITIAL_CONTEXT_FACTORY, "com.sun.jndi.ldap.LdapCtxFactory");

// Must use the name of the server that is found in its certificate
env.put(Context.PROVIDER_URL, "ldap://172.31.24.194:389");
// Create initial context
LdapContext ctx = new InitialLdapContext(env, null);

// Start TLS
StartTlsResponse tls = (StartTlsResponse) ctx.extendedOperation(new StartTlsRequest());
tls.setHostnameVerifier((s, d) -> true);
tls.negotiate(new DefaultSSLFactory()); # cn.hutool.http.ssl.DefaultSSLFactory

// Perform simple client authentication
ctx.addToEnvironment(Context.SECURITY_AUTHENTICATION, "simple");
ctx.addToEnvironment(Context.SECURITY_PRINCIPAL, "cn=directory manager,dc=jianggujin,dc=com");
ctx.addToEnvironment(Context.SECURITY_CREDENTIALS, "jianggujin");
// do something
ctx.close();
2.4.6 Java代码测试连接(原生ldaps模式)
自定义SocketFactory(用于忽略证书验证,如生产环境不需要则忽略该步骤,需要将证书导入Java证书库)
javaimport cn.hutool.http.ssl.DefaultSSLFactory;

import javax.net.SocketFactory;
import java.io.IOException;
import java.net.InetAddress;
import java.net.Socket;
import java.net.UnknownHostException;

public class CustomSocketFactory extends SocketFactory {
    private DefaultSSLFactory factory;

    /**
     * 该方法非常重要,不能删除,且返回类型为当前类,否则会不匹配导致类转换错误
     **/
    public static SocketFactory getDefault() {
        return new CustomSocketFactory();
    }

    public CustomSocketFactory() {
        factory = new DefaultSSLFactory();
    }

    @Override
    public Socket createSocket(String s, int i) throws IOException, UnknownHostException {
        return factory.createSocket(s, i);
    }

    @Override
    public Socket createSocket(String s, int i, InetAddress inetAddress, int i1)
            throws IOException, UnknownHostException {
        return factory.createSocket(s, i, inetAddress, i1);
    }

    @Override
    public Socket createSocket(InetAddress inetAddress, int i) throws IOException {
        return factory.createSocket(inetAddress, i);
    }

    @Override
    public Socket createSocket(InetAddress inetAddress, int i, InetAddress inetAddress1, int i1) throws IOException {
        return factory.createSocket(inetAddress, i, inetAddress1, i1);
    }
}
测试代码如下:
javaHashtable<String, Object> env = new Hashtable<>();
env.put(Context.INITIAL_CONTEXT_FACTORY, "com.sun.jndi.ldap.LdapCtxFactory");
env.put(Context.PROVIDER_URL, "ldaps://172.31.24.194:636");
env.put(Context.SECURITY_AUTHENTICATION, "simple");
env.put(Context.SECURITY_PRINCIPAL, "cn=directory manager,dc=jianggujin,dc=com");
env.put(Context.SECURITY_CREDENTIALS, "jianggujin");
env.put("java.naming.ldap.factory.socket", CustomSocketFactory.getClass().getName());
// Create initial context
LdapContext ctx = new InitialLdapContext(env, null);
// do something;
ctx.close();
第三部分 引用


本文作者:蒋固金
本文链接:
版权声明:本博客所有文章除特别声明外,均采用 BY-NC-SA 许可协议。转载请注明出处!